1. Introduction
This section presents the basics concepts of an Angular App.
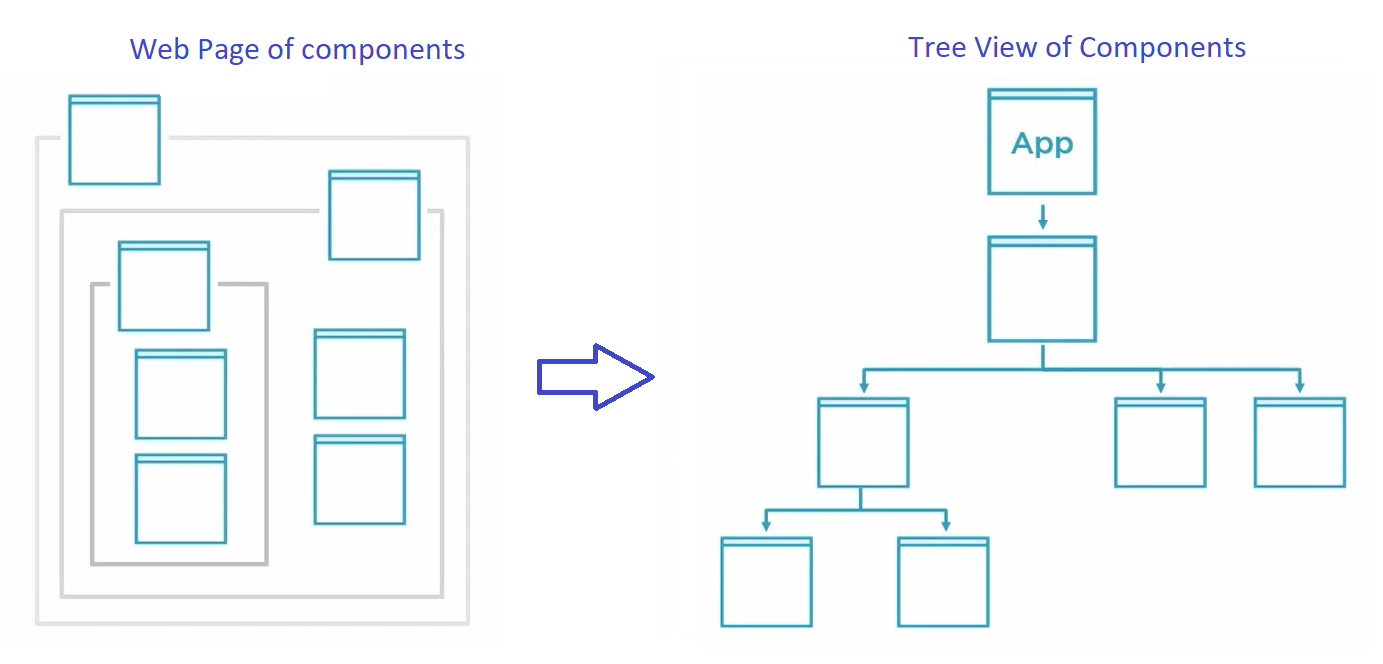
1. Angular Component Hierarchy
From a web browser perspective, a web app built with Angular is an imbrication of components.
From a code perspective, components have a hierarchy and translate into a tree view
2. Declaration of an Angular module
@NgModule({
  declarations: [
    MyComponent,
    MyPipe
    MyDirective
  ],
  imports: [
    OtherModule
  ],
  providers: [MyService],
  bootstrap: [MyComponent]
)}
export class AppModule { }
- declarations → components, pipes or directives imported in a module must be declared
- imports → use to import other modules
- providers → services are added over here
- bootstrap → the root component that Angular creates and inserts into the index
3. Declaration of an Angular commponent
@Component({
  selector: 'app-simple',
  templateUrl: './simple.component.html',
  styleUrls: ['./simple.component.scss']
})
export class SimpleComponent implements OnInit {
  person = {
    id: 1,
    name: 'David',
    age: 30
  }
}
- selector → the selector of our component that we should use in our HTML to reference it
<app-simple></app-simple> - templateUrl → HTML template file of our component
- styleUrls → style of our component
Our HTML code could look like this for example, double brackets are used for binding data in template:
<div>
  <h2>Simple Example</h2>
  <div>Name: {{person.name}}</div>
  <div>Age: {{person.age}}</div>
</div>
4. Component communication basics
4.1. Pass Data from Parent to Child component with @Input
In the parent component, let's assume we have a variable initialized as follows:
@Component({
  selector: 'app-parent',
  template: `<div>
    <child-component [childData]=”parentData”></child-component>
  </div>`
})
export class ParentComponent {
  parentData = 'test';
}
The data is binded to a child property using [];
In our child component, we use the @Input decorator to bind
@Component({
  selector: 'app-child',
  template: `<div>
    Data: {{childData}}
  </div>`
})
export class ChildCcomponent {
  @Input() childData: string;
}
4.2. Pass Data from Child to Parent component with @Output
Let's assume we have the following child component.
@Component({
  selector: 'app-child',
  template: `<button (click)="handleClick()>Click me !</button>`
})
export class ChildComponent {
  @Output() clickEvent: EventEmitter<string> = new EventEmitter<string>();

  handleClick() {
    this.clickEvent.emit(value);
  }
}
To signal a change in the parent component, we use the EventEmitter API and the @Output decorator.
@Component({
  selector: 'app-parent',
  template: `<div>
    <child-component (changeEvent)=”handleEvent($event)”></child-component>
  </div>`
})
export class ParentComponent {
  parentData = 'test';

  handleEvent(value) {
    console.log("received: ", value);
  }
}
4.3. Template Variable
In a template, we use the hash symbol, #, to declare a template variable.
It can be very interesting to use template variables in a number of usecases.
If we declare the variable on a standard HTML tag, the variable refers to that element as shown if the following example.
<input #phone placeholder="phone number" />

<!-- ... -->

<!-- phone refers to the input element; pass its `value` to an event handler -->
<button (click)="callPhone(phone.value)">Call</button>
If we declare the variable on a component, the variable refers to the component instance. This allows to do some powerful things like call public properties or methods of the component. For example, given a child component:
@Component({
  selector: 'app-child',
  template: `<div></div>`
})
export class ChildComponent {
  someProperty: string = "some value"
  displayMessage() {
    console.log("Hi There !");
  }
}
Our parent can now access the property and method of the child:
@Component({
  selector: 'app-parent',
  template: `<div>
    <child-component #child></child-component>
    <button (click)="child.displayMessage()">Log Message</button>
    <h3>{{child.someProperty}}<h3>
  </div>`
})
export class ParentComponent { }